With the store gone and so much going on lately I haven't blogged or sewed in quite some time now. I feel a lack of interest since everything was taken. I'm sure that soon I will come to my senses and start making up for lost time, but for now I am happily enjoying the summertime pleasures that Colorado has to offer. I've also taken up a new hobby that I have been really enjoying and spending alot of time doing. Cheer season is in gear again and I'll be busy agin with all that bow making.....YIKES...better get started soon. Hope everyone is enjoying there summer! ~Nicki
Wednesday, July 1, 2009
Thursday, June 11, 2009
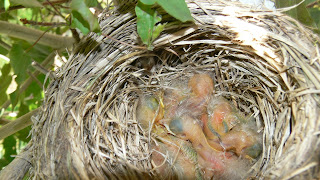
New life

I was sitting on our porch swing two weeks ago and noticed a nest in our tree. There was mom taking care of her 4 beautiful eggs. I love the miracle of life, how fragile it is and how incredible.

Today we went to the hospital to take my mother in law off of life support. Such a beautiful and kind women I wish that you all could have met her. We will miss her dearly. After coming home Chris and I checked the eggs.....new life. It was a beautiful thing. And a true reminder of the new and perfect life that Patty received today. We love and miss you already mom. :(
(

Saturday, May 16, 2009
What I am doing now that I have spare time......
I have alot of extra time now. Tanner is playing roller hockey and I have time to enjoy this beautiful wheather. I have struggled with everything that was done to us, but things will work themselves out in the end I am sure. I am picking up new hobbies like soap making and making all of my meals from scratch with fresh herbs from the garden.
I will continue to post fun and exciting stuff on here. Quilt patterns, children's patterns, recipes, crafts, ect. Give us a little more variety. For now here are some pics of what I have been doing this weekend. Enjoy the warm sun and I'll talk to you soon!!


Friday, April 17, 2009
Some rainy day fun.....
With the rain coming down we need something creative and fun to do! So, enjoy!!!
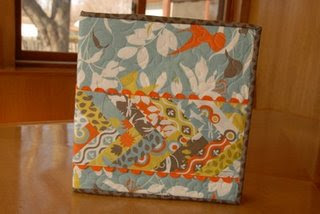
Fun Binder Cover!!
Use as a photo album, quilting articles, a journal, the options are endless!
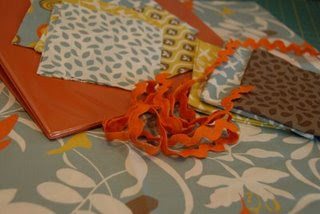
Supplies:
1/2 yard of a large scale print
2 fat quarters for pockets
1 fat quarter for binding
1 charm pack
1/2 yard backing fabric
1 leftover piece of lightweight batting1
1/2 yard ric rac
(I used Arcadia by Sanae for Moda)
 From your large scale print, batting, and backing, cut a piece 3 inches taller and wider than your binder. It will shrink up a bit when quilted. (My binder measures 11 1/2 x 24. Yours may vary!)
 From the charm pack, cut strips 1 1/2 inch wide x 5 inches. (I used about 46 pieces for mine.) You can leave the pinked ends on them. They will be trimmed later.
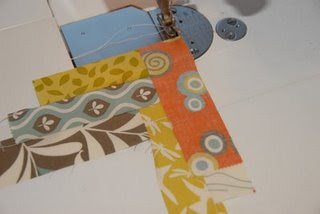
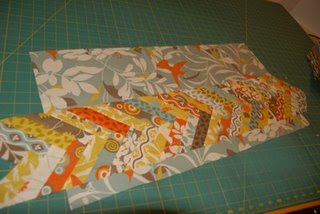
Sew your first two 1 1/2 x 5 inch pieces together as shown in the photo.

Continue to add 1 1/2 strips until your braid piece is longer than the width of your large scale print piece.
Trim the uneven edges as shown

Cut both ends of your braid piece straight, leaving them a little longer than needed.

Sew the ric rac on the long sides, 1/4 inch from the edge.

Press, turning raw edges under.

Pin the bottom edge of the braid piece 2 inches from the bottom edge of the large scale print.

Topstitch both long edges to the large print piece.
Layer your backing, batting, and top and quilt as desired. I just did a quick meander, and left the braid section unquilted.


Carefully measure your binder and cut your quilted piece 1 inch taller and 1 inch wider than the binder.
You now have a cute little mini quilt!
Cut your pockets the height of your quilted piece by 16 inches. Fold in half so the piece is 8 inches wide and press. Pin the pockets to the back of your quilted piece as shown.

The fold should be to the center

Stitch the pockets down a scant 1/4 inch on three sides, leaving one side open for the binder.
Slide the binder into the pockets. At this point, you can adjust the size if the quilted piece is too loose. The binding will tighten it up just a bit, so don’t make it too tight. (Ask me how I know this!!!)

Cut your binding 2 1/4 wide and press. Sew binding to the quilt cover. Hand stitch your binding to the back side.
Slide your binder into your cover. Sit back and marvel at how cool it is!!!


I dare you to make just one! Maria at passingdowncrazy
Wednesday, April 15, 2009


Quilt Making 101

We've had a ton of fun in our Quilt Making 101 class.
Be sure to sign up for our next 101 class in May
 Busy at work
Betty doing a fantastic job of "pressing" not ironing!!
Tuesday, March 31, 2009
April Specials and Announcements
We are pleased to announce “
The Tax Time Rebate Event!’
running for 6 days only from April 15 to April 20 2009.
This promotion offers mail-in rebates plus accessory shopping sprees on four popular models.
Mail-In Rebates PLUS Accessory Shopping Spree
This promotion offers mail-in rebates plus accessory shopping sprees on four popular models.
Mail-In Rebates PLUS Accessory Shopping Spree
~Quattro™ 6000D: $400 mail-in rebate PLUS $400 in-store Accessory Shopping Spree
~Innov-ís 1500D: $150 mail-in rebate PLUS $150 in-store Accessory Shopping Spree
~LB6770PRW: $75 mail-in rebate PLUS $75 in-store Accessory Shopping Spree
~Innov-ís 80: $50 mail-in rebate PLUS $50 in-store Accessory Shopping Spree

Come in for some special easter saving and free gifts!!
Mention that you visited our blog and recieve an
easter egg to recieve a discount on your fabric or a free gift!

Visit Sew Mama Sew for the pattern pictured above!!
http://sewmamasew.com/blog2/?p=431
Mother's Day Special!
All Horn Cabinets 40% off!

Monday, March 23, 2009
Water Bottle Carrier
 This water bottle carrier was inspired when I found myself carrying everyone’s water in my backpack for the 4th of July parade. Next time, everyone can carry thier own water!
Cutting Instructions
Cut one piece of fabric for the exterior and one piece for the interior each 10 3/4 wide x 8 inches tall. I’ve pieced my exterior fabric with two coordinating prints in the tutorial pictures.
Cut 2 circles of your lining fabric, the circle should have a 3 3/4 inch diameter. The diameter of the circle stitching line is 3 inches. Add an additional 3/8 inch seam allowance making the cut circle diameter 3 3/4 inches.
Cut one piece of Insul-Brite 9 x 7 inches. Cut one Insul-Brite circle with a diameter of 3 inches.
For strap, cut one length of twill tape and one length of ribbon, both 42 inches long. This fits my 8 and 11 year old daughters. When I sized it for myself I cut it 50 inches long.

Sew exterior to lining along the top edge only, right sides together using a 3/8 inch seam.

Press open seam.

The Insul-Brite is going to get sandwiched between the exterior and the lining. Pin Insul-Brite to the wrong side of exterior fabric, aligning and centering top of batting with the joined seam line. Pin in place about an inch down to keep batting from sliding around. Fold over the the lining fabric and pin some more. Top stitch 1/4 inch along the top edge. This provides a baseline anchoring of the batting.


Pin entire sandwich like a quilt, securing as needed to keep layers from puckering when stitched. Stitch all layers as you please. Repeat this for the bottom circle. Finish bottom edge of top and edges of circle with a zigzag stitch or serger.

I used a French seam to join the side edges of the carrier. A French seam is two steps which result in the raw edge being trapped inside the second seam. Use some scraps and do a practice seam if this is the first time trying this. This seam is great for fairy skirts too!
Step One: Pin WRONG sides of sides together and stitch a 1/4 inch seam. Don’t press seam open, you want them to lay flat together.

Step Two: Turn tube wrong side out. Pin again along the edge, RIGHT sides together and stitch a 3/8 inch seam. This seam will ‘trap’ the previous seam inside. This gives you a nice clean finished edge for the inside of your carrier

7. Leave tube with lining turned to the outside. Pin bottom circle to tube’s raw edge, right sides together. Clip edges of the tube to make fitting easier. Only clip about 1/4 inch into seamline

Stitch using a 3/8 inch seam.

9. Turn carrier right side out.
 10. Attach twill tape to ribbon with a single stitch down the center.
 11. Turn up 1 inch of strap raw edge and attach to inside edge of tube, centering ends on either side of the carrier side seam. (After making this I think it would have been easier to attach the strap before creating the tube.)

12. Enjoy watching your kids carry their own water bottle.
Thanks to Pink Chalk Studio for this awesome pattern!!
Monday, March 16, 2009
Look What Judy was able to make with the Accuquilt!!
It's as easy as 1-2-3!!


"I just cut out pieces for a Puss in the Corner pattern, crib size. Strips slightly wider than 4.5 inches were folded back and forth over the 4.5 square die. 2.5 wide strips of two fabrics were also die cut. They were stitched together in sets of two. After that, they were cross cut on the strip die into 2.5 segments. Quite a timesaver!" -Judy
Subscribe to:
Posts (Atom)