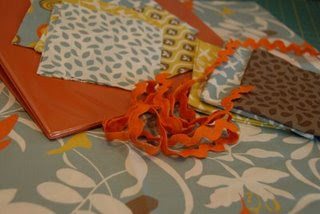
 From your large scale print, batting, and backing, cut a piece 3 inches taller and wider than your binder. It will shrink up a bit when quilted. (My binder measures 11 1/2 x 24. Yours may vary!)
 From the charm pack, cut strips 1 1/2 inch wide x 5 inches. (I used about 46 pieces for mine.) You can leave the pinked ends on them. They will be trimmed later.
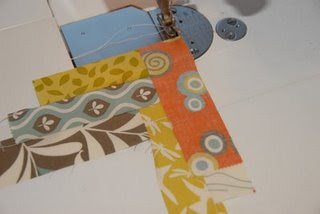
Sew your first two 1 1/2 x 5 inch pieces together as shown in the photo.

Continue to add 1 1/2 strips until your braid piece is longer than the width of your large scale print piece.
Trim the uneven edges as shown

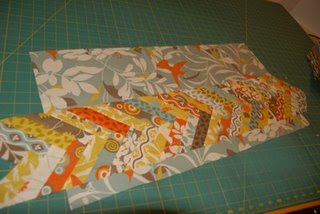
Cut both ends of your braid piece straight, leaving them a little longer than needed.

Sew the ric rac on the long sides, 1/4 inch from the edge.

Press, turning raw edges under.

Pin the bottom edge of the braid piece 2 inches from the bottom edge of the large scale print.

Topstitch both long edges to the large print piece.
Layer your backing, batting, and top and quilt as desired. I just did a quick meander, and left the braid section unquilted.


Carefully measure your binder and cut your quilted piece 1 inch taller and 1 inch wider than the binder.
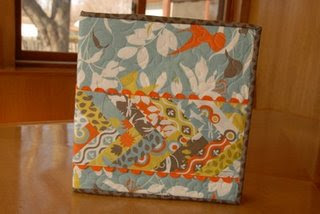
You now have a cute little mini quilt!
Cut your pockets the height of your quilted piece by 16 inches. Fold in half so the piece is 8 inches wide and press. Pin the pockets to the back of your quilted piece as shown.

The fold should be to the center

Stitch the pockets down a scant 1/4 inch on three sides, leaving one side open for the binder.
Slide the binder into the pockets. At this point, you can adjust the size if the quilted piece is too loose. The binding will tighten it up just a bit, so don’t make it too tight. (Ask me how I know this!!!)

Cut your binding 2 1/4 wide and press. Sew binding to the quilt cover. Hand stitch your binding to the back side.
Slide your binder into your cover. Sit back and marvel at how cool it is!!!


I dare you to make just one! Maria at passingdowncrazy


 Busy at work