Tuesday, March 31, 2009

April Specials and Announcements

We are pleased to announce “
The Tax Time Rebate Event!’
running for 6 days only from April 15 to April 20 2009.

This promotion offers mail-in rebates plus accessory shopping sprees on four popular models.
Mail-In Rebates PLUS Accessory Shopping Spree

~Quattro™ 6000D: $400 mail-in rebate PLUS $400 in-store Accessory Shopping Spree
~Innov-ís 1500D: $150 mail-in rebate PLUS $150 in-store Accessory Shopping Spree
~LB6770PRW: $75 mail-in rebate PLUS $75 in-store Accessory Shopping Spree
~Innov-ís 80: $50 mail-in rebate PLUS $50 in-store Accessory Shopping Spree

Come in for some special easter saving and free gifts!!

Mention that you visited our blog and recieve an
easter egg to recieve a discount on your fabric or a free gift!


Visit Sew Mama Sew for the pattern pictured above!!


http://sewmamasew.com/blog2/?p=431


Mother's Day Special!

All Horn Cabinets 40% off!


Monday, March 23, 2009

Water Bottle Carrier


This water bottle carrier was inspired when I found myself carrying everyone’s water in my backpack for the 4th of July parade. Next time, everyone can carry thier own water!
Cutting Instructions

Cut one piece of fabric for the exterior and one piece for the interior each 10 3/4 wide x 8 inches tall. I’ve pieced my exterior fabric with two coordinating prints in the tutorial pictures.
Cut 2 circles of your lining fabric, the circle should have a 3 3/4 inch diameter. The diameter of the circle stitching line is 3 inches. Add an additional 3/8 inch seam allowance making the cut circle diameter 3 3/4 inches.
Cut one piece of Insul-Brite 9 x 7 inches. Cut one Insul-Brite circle with a diameter of 3 inches.
For strap, cut one length of twill tape and one length of ribbon, both 42 inches long. This fits my 8 and 11 year old daughters. When I sized it for myself I cut it 50 inches long.

Sew exterior to lining along the top edge only, right sides together using a 3/8 inch seam.


Press open seam.


The Insul-Brite is going to get sandwiched between the exterior and the lining. Pin Insul-Brite to the wrong side of exterior fabric, aligning and centering top of batting with the joined seam line. Pin in place about an inch down to keep batting from sliding around. Fold over the the lining fabric and pin some more. Top stitch 1/4 inch along the top edge. This provides a baseline anchoring of the batting.


Pin entire sandwich like a quilt, securing as needed to keep layers from puckering when stitched. Stitch all layers as you please. Repeat this for the bottom circle. Finish bottom edge of top and edges of circle with a zigzag stitch or serger.


I used a French seam to join the side edges of the carrier. A French seam is two steps which result in the raw edge being trapped inside the second seam. Use some scraps and do a practice seam if this is the first time trying this. This seam is great for fairy skirts too!
Step One: Pin WRONG sides of sides together and stitch a 1/4 inch seam. Don’t press seam open, you want them to lay flat together.


Step Two: Turn tube wrong side out. Pin again along the edge, RIGHT sides together and stitch a 3/8 inch seam. This seam will ‘trap’ the previous seam inside. This gives you a nice clean finished edge for the inside of your carrier


7. Leave tube with lining turned to the outside. Pin bottom circle to tube’s raw edge, right sides together. Clip edges of the tube to make fitting easier. Only clip about 1/4 inch into seamline


Stitch using a 3/8 inch seam.


9. Turn carrier right side out.

10. Attach twill tape to ribbon with a single stitch down the center.

11. Turn up 1 inch of strap raw edge and attach to inside edge of tube, centering ends on either side of the carrier side seam. (After making this I think it would have been easier to attach the strap before creating the tube.)


12. Enjoy watching your kids carry their own water bottle.


Thanks to Pink Chalk Studio for this awesome pattern!!


Monday, March 16, 2009

Look What Judy was able to make with the Accuquilt!!
It's as easy as 1-2-3!!


"I just cut out pieces for a Puss in the Corner pattern, crib size. Strips slightly wider than 4.5 inches were folded back and forth over the 4.5 square die. 2.5 wide strips of two fabrics were also die cut. They were stitched together in sets of two. After that, they were cross cut on the strip die into 2.5 segments. Quite a timesaver!" -Judy

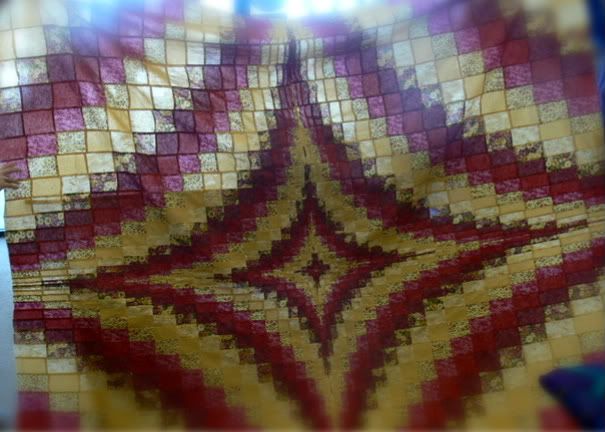
Radiating Diamonds


Photobucket

We had the wonderful pleasure of having author Nelline Kornock teach her Radiating Diamonds Class in our store.
This is a picture of Dorothy's beautiful Radiating Diamonds top completed!
Come in to check out some of the great classes we have scheduled!!

Friday, March 13, 2009

Petit Fours Table Runner

Petit Fours Table Runner


Petit four (plural: petits fours): a tiny, bite-sized cake with delicate layers of moist cake filled with smooth butter cream and jam fillings. Each cake measures approximately 1.5 " x 1". The miniature cake is often dipped in fondant and decorated with piped icing flowers. The name is from the French petit four, meaning "small oven".


Supplies:


1 Charm Pack (40 - 5" squares) I used Wildflower Serenade 2 by Kansas Troubles
1/8th yard for inner border


1/8th yard for binding
Backing and batting at least 15" x 47"


Instructions:


Select 27 (I used the top 27 from Wildflower Serenade) of the 5" squares and cut each into 3-1.5" strips. This will give you 81 strips that are 1.5 x 5". You need 80. Have a nice sharp blade and you can stack and cut several charms at once.
Reserve the remaining 13 charms for the outside border.


Sew into 40 pairs of 2


Sew 2 pairs together. Repeat until you have 20 sets of 4 strips.


Press all seams one direction.


Trim length to 4.5". I stacked 4 blocks; trimmed 1/4" off one end...


then trimmed the other end to equal 4.5".


Sew two 4-strip units together as shown below. Repeat to make 10 units


Press as shown below


Sew these units together...


to make 5 blocks like this.


Cut the inner border fabric into 3-1" strips. Attach the inner border to the long sides of the runner first, then to the short ends.


Take the last 13 charms and cut at 2". You will get 2 pieces that are 2" x 5" per charm.


Sew 2 sets of 3 together and 2 sets of 10 together.


Attach to long sides of the runner first, matching center seam of runner with center seam of border. Trim off the extra
Put a pin in the center of the 3-charm strips and match to the middle seams on the short ends of the runner. Stitch. Trim off the extra.


Quilt, bind and make another one.


I think it's sew fun getting a tablerunner from 1 charm pack!!


One tablerunner 12" x 43.5"
Happy Quilting from Angela Davy at All Washed Up


Tuesday, March 10, 2009

Don't forget to sign up for the Quilt Till You Wilt!


We're going to have a blast with Quilt Till You Wilt on April 24th!

Come with your UFOs and a small dish to share

We'll have a ton of fun and you'll receive a gift bag valued at $60 to take home!

5:30-midnight

$30

Thursday, March 5, 2009

Anita Goodesign Blowout Sale!!

Buy any 3
Anita Goodesigns or Dakota Collectables
and recieve 1 free!!*

*Of equal or lessor value

Monday, March 2, 2009

Another Pattern to play with!

Supplies
One charm pack (Hello Betty by Chloe's Closet for Modawas used in this project)
1/2 yard (Bella Solid Ivory block) background
3/4 yard (Bella Solid Betty Pink) alternating blocks
1/3 yard (Bella Solid Betty Green) binding
1 yard backing
batting 36 x 44


Instructions

Select 32 charm squares from your Charm Pack. From each square cut (2) 2 1/2 inch squares and (2) 1 1/2 inch squares

Cut (64) 2 1/2 inch ivory squares
Cut (31) 4 1/2 inch pink setting squares

For each bowtie block you will need (2) 2 1/2 inch and (2) 1 1/2 inch bowtie squares and (2) 2 1/2 inch ivory squares


Draw a diagonal line on the wrong side of each of the 1 1/2 inch squares

Place a small square on each of the 2 1/2 inch background squares and sew on the line. These are your knot units.


Press towards the knot and cut away the back of the knot fabric in the middle, leaving the background piece.

Sew your block together as shown :


Press center seam open if desired, for a flat center


Make 31 more blocks! They're super fast. Set in 9 rows of 7 blocks alternating bows and pink setting blocks, using completed quilt as a guide. Layer and quilt as desired. This old fashioned quilt is perfect for grid quilting (on sample) or meandering! Bind with Betty Green Solid and enjoy!


Tumbling Blocks Class coming up soon!!


Only a couple of spaces left in Elaine's Tumbling Blocks class! Kits with marbles and batiks available with all 15 of your diffrent colors. This wonderful technique has NO Y SEAMS!! You'll make this extravagant quilt using a strip piecing.